
Server room at CERN by torkildr
Azure webhosting is cheap?? Surely not!
Perhaps you haven’t considered using Azure to host a simple, small sized, low-traffic website, with SSL certificate and a (BYO) custom (sub) domain because you assume the cost would be higher than other options? This may not be the case depending on your situation and needs.
Before we dive in. This hosting is focused on websites where you want more control over the code and web designs (eg. Plain HTML, a Single Page App (SPA), or a Server-Side website) and don’t mind the designer/dev/admin/setup work. If you just need a low code CMS style system supporting custom domain and SSL with web designs ready to go, maybe WordPress, WIX, or Squarespace are a better fit.
I’ve used all the below options for both my own projects and client’s projects with advanced requirements like geo-filtering (Azure CDN provides this). I’ll give you the details on two options for client-side hosting and one option for server-side hosting, all include the ability to use a custom domain with SSL. I’ll go from the cheapest (FREE!) to likely usage of a few cents per month (depending on traffic and site content), so yes, quite cheap. I’ve also included tutorials at the end so you can test out the discussed hosting options.
Can i use my custom root domain?
Yes, but they require more advanced configuration steps (with some limitations based on your registrar) or paying for an Azure App Service plan. For simplicity, the below options are based on using a subdomain entries only. If the site you want to host is for a root domain, most popular domain registrars (namecheap, gandi, etc) provide a HTTP/S redirect service. To avoid registering your root domain in azure you can send users / crawlers requesting yourdomain.com to a subdomain like www.yourdomain.com using a 301 Permanent redirect (for best option search engine optimisation). Alternatively if you want to host from the root domain see the links in the Root domain DNS Configuration section below, you can even purchase a root domain through a paid Azure App Service plan.
Knowledge
The below assumes you are a web dev or administrator familiar with web site/application concepts. Have a basic understanding of Azure, Azure CLI and the Azure (web) portal. It’s also best to have a basic understanding of HTTP, DNS, and (optionally) have registered a custom domain you want to use. If this all sounds foreign, or you are just starting out in web hosting, check out the links at the end to get a deeper understanding.
Disclaimer: I am not receiving anything from Microsoft for recommending these PaaS offerings. These recommendations come from my own experiences. Pricing may change over time.
Option 1: Azure Static Web Apps – Free Tier
If you have a static website (eg HTML + CSS + Images + Javascript) or a SPA (React, Vue, Svelte, Angular, etc) or even SPAs with server capabilities (NextJS, Nuxt, etc) you could use the Free tier of Azure Static Web Apps (SWA). SWA allows you to point your custom domain to Azure’s azurestaticapps.net hostname (Free tier offers 2 free custom domain registrations with free SSL). There are some site storage and traffic limits like 1GB storage on the free tier to be aware of, there’s also a premium offering.
This option is the quickest way to get a website with a custom domain up and running on HTTPS. All you need to do is create a SWA resource in Azure, deploy your code and register a CNAME subdomain with your domain registrar to their <someprefix>.azurestaticapps.net hostname. The tutorial later will demonstrate just how quick it can be.
SWA is quite feature-rich for a free product including fast setup and deploy with the SWA CLI, GitHub/Azure DevOps build/deploy integration, CDN distribution, Auth integration, API server-side functions (via Azure Functions), and more. SWA offers support for many front-end frameworks .
Option 2: Azure Storage Static Website
If you have static HTML/CSS/Javascript/Image files you need to host on the web without much complexity or bells and whistles like Static Web Apps Azure, Azure Storage may be an option to consider. Pricing is USD$0.02/GB/month (most storage with very minimal disk usage get a monthly bill of <$0.01) you can simply create the cheapest option Azure Storage account (General purpose v2, Locally Redundant Storage LRS Hot storage) enable the Static website mode, upload your files to the $web blob storage container and access it on https://<prefix>. web.core.windows.net. This is also very quick to get up and running as you’ll see in the tutorial later.
Can i use my own domain with Azure storage static website?
Azure CDN can take care of this by pointing a custom domain to your storage website. This is also done when hosting on an Azure App Service Free tier (discussed in option 3) in the tutorials. While it is possble to use root domains with Azure CDN, for ease of setup in the tutorials it will use a subdomain (CNAME) of your custom domain pointing to the Azure CDN endpoint hostname. You can register the subdomain with your domain registrar as CNAME eg www.ilikedogs.com pointing to https://<endpointname>.azureedge.net. This CDN endpoint then points to the storage static site url and caches content at edge servers.
Azure CDN Classic costs USD$0.08/GB of traffic for North America (some zones are higher like Brazil at USD$0.23/GB) and provides free SSL certificates on subdomains. You can also enable advanced features (some at extra cost) like a Geo filtering, WAF, and redirect/routing rules. You can see a comparison in Azure CDN – Features .
I’d recommend using Azure CDN Classic over Azure CDN EdgeIO Standard (charged at similar rates) as you get advanced routing/redirect features.
Option 3: Azure App Service – Free Tier
Azure App Service offers hosting for server side web apps for several frameworks, mobile backends, static html and RESTful APIs as well as Docker containers. Their Free tier offers 1GB RAM, 1GB Storage and 60 CPU minutes/day as well as plenty more features but with limited capacity and features compared to the paid plans.
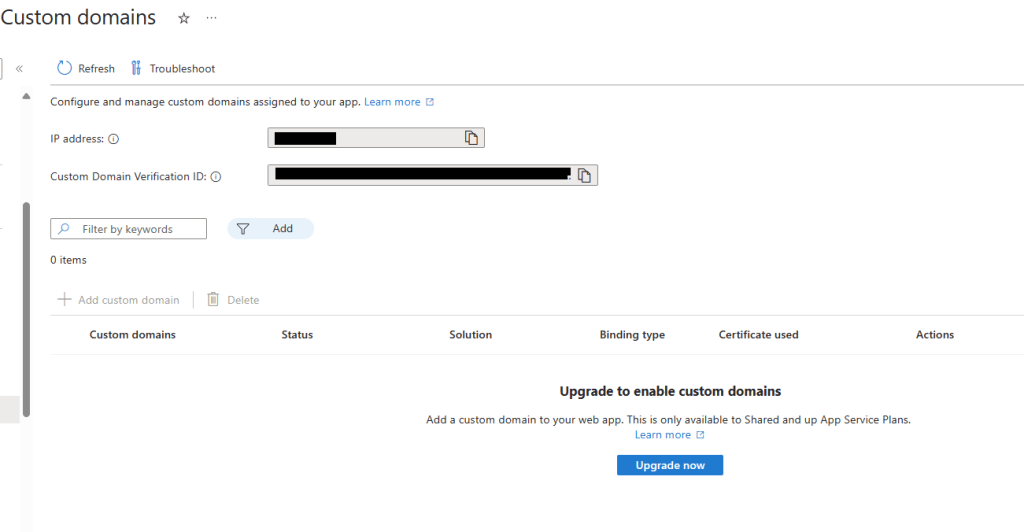
If you have a server side website that requires an Azure Web App (like Java, .Net, Python, Node, etc) and only have a small app memory footprint and low traffic, the Azure App Service Free Tier may be suitable. The only problem is when you use the Free tier to host it and go to the Custom domains blade of the App Service in Azure Portal you would get this screen to upgrade to a paid plan 😱
If you don’t need anything more than the CPU, Mem and Storage mentioned earlier, and don’t want to pay up to a potential max ~USD$13/month for the Linux Basic B1 plan to support SSL certs and a custom domain there is a way to use a custom domain. Azure CDN can be registered with a custom domain and can point to your App Service site, the same as mentioned in the previous section pointing to the Azure Storage Static Website. As a comparison, the max ~USD$13/month cost of a Basic (B1) Linux App Service plan (to get a custom domain and SSL functionality) is roughly equal to 162GB of traffic costs on the CDN.
NOTE: If you really need to host a root domain with the App Serivce or don’t want CDN and dont mind the extra steps of setting up a free SSL/TLS certificate you may get better mileage on an App Service Basic Linux plan as billing is pro-rated by the second from an average North America fee of 0.02USD/hour. More details in Azure App Service Linux – Pricing . If it is idle it will shutdown and you won’t be charged, the only catch is the cold start.
Cold start what is that? and why is it a problem?
Cold start means after an idle time (default 20mins) of no requests your App Service will shut down and the next request will take time to be served as the app will need to warm up. This can create a slow page load for the first visitor as well as if using the Free Tier and the CDN has not cached a page, it will trigger the App Service to cold start.
There is a setting “Always on” (only available from plans Basic upwards) to not shutdown on idle, but it means you are charged for the max hosting cost for the month (eg Linux Basic B1 plan ~USD$13/month). There is however an option to use with the Free plan that has two benefits, both keeping the App Service alive and reporting to you if the site is inaccessible via an alert.
Availability tests
In Azure App Insights you can create an Availability test, currently the Classic (ping) test is free but will expire in 2026 and incur a minor cost. See the web tests section here .
This is a simple feature to add, you can find the steps to create a test to keep your app alive here: Create an Availability URL ping test . Once in place your app will be active all the time as the max ping test interval is 15mins. You can verify this by looking at your app service plan CPU usage pre and post ping test creation.
At a minimum I’d recommend pointing your ping test to the App service url to keep it alive. Adding an extra one to your custom domain will ensure both the DNS entry and the CDN are verified as working.
Ok, lets get our hands dirty with tutorials of these options……
Tutorials
- Option 1 – Static Web App
- Option 2 – Azure Storage Static Website
- Option 3 – Azure App Service Free Tier
Tutorial Requirements
These tutorials require:
- An Azure account
- Azure CLI + Powershell or Bash (most commands can interchange fine between powershell/bash)
- NodeJS 18 (20 support coming soon for Azure SWA)
Download links are at the bottom for the installers. If you don’t already have an Azure account you can sign up with a free account (credit card required).
If you already have Azure CLI be sure to run the upgrade first
az upgrade --all -yAll the below commands are using -l australiaeast which creates resources in the Australia East region. You can set these to a region closer to you, for a list of names you can use for the -l paramter run:
az account list-locations --query "[].name" -o tsv Tutorial 1 – Azure Static Web App
Pre Reqs: NodeJS 18, Powershell or Bash, Azure CLI (logged with subscription set)
In an empty folder with Powershell / Bash with admin rights:
npx create-react-app mysite --template typescript

cd mysite
If you don’t already have the SWA CLI
npm install -g @azure/static-web-apps-cliThe SWA login below will take your browser to login to your azure account. Follow the defaults in the SWA Init. On the last command you will be prompted to create a new Azure SWA free tier resource, press Y and use the default name.
swa login

swa init

swa build

az group create -n swatest -l australiaeast

swa deploy --env production --resource-group swatest
🎉 Browse to the output Url from the final command. You should see the react logo. 🎉
The swa login and swa init commands setup .env and swa-cli.config.json files respectively in the current folder. The swa build command is a superset of npm build which will using the swa-cli.config.json to build both the static web app and the server side api functions. swa deploy will use azure environment info in .env and swa-cli.config.json to deploy or prompt then add details like the resource group and app name.
Note how we specified –env production in the swa deploy . By default, it will deploy to a preview ‘slot’ which you can then promote to the live slot aka production which is the main url. Preview slots have a different subdomain structure.
—– Bonus Section – Use a custom domain on HTTPS —–
az staticwebapp show -n mysite --query "defaultHostname" -o tsvCopy the the output. You’ll note this is the same hostname you browsed to.
Go to your Domain registrar web portal and add a CNAME entry with a new subdomain and hostname as copied value (make sure you have a . (period) at the end eg: <somename>.azurestaticapps.net.
Now run the command to set your custom domain name.
az staticwebapp hostname set -n mysite --hostname <ilikedogs.mydomain.com>You may get a CNAME is not valid error from this command and have to wait a little while for the CNAME to propagate to more DNS servers, also double check you have the . (period) at the end in your registrar CNAME entry and try the command again.
🎉 Browse to your custom domain eg https://ilikedogs.mydomain.com 🎉
Cleaning up
Delete your CNAME subdomain you created with your domain registrar, then:
az group delete -n swatestMore Reading
SWA Custom Domains Documentation
Tutorial 2 – Azure Storage Static Website
Prereqs: Powershell or Bash, Azure CLI (logged with subscription set)
In Powershell / Bash as an admin in and empty directory, run the following commands. Note the second command and any following references use your own unique name for teststoragewebsite.
az group create -n storagewebsitetest -l australiaeast

az storage account create -n teststoragewebsite -g storagewebsitetest --sku Standard_LRS -l australiaeast

az storage blob service-properties update --account-name teststoragewebsite  --static-website --404-document 404.html --index-document index.html

mkdir site

echo "<html><body>404</body></html>" >> site/404.html

echo "<html><body>Welcome!</body></html>" >> site/index.html

az storage blob upload-batch -s .\site -d '$web' --account-name teststoragewebsite

az storage account show -n teststoragewebsite  --query "primaryEndpoints.web" --output tsv
🎉 Browse to the output Url from the final command. You should see the word ‘Welcome!’ 🎉
You can see from the above commands we created a resource group and storage account, then enabled static-website mode which creates a $web container in the blob storage. After that we created index and 404 html files and uploaded them to the $web container. Finally we retrieved the url for the primary web endpoint of the storage account.
If you navigate to another madeup page eg <url>/testurl.html it should show the text ‘404’
—– Bonus Section – Setup Azure CDN with custom domain —–
Make note of the full hostname in the storage site you browsed to and use it in the below command ‘az cdn endpoint create’ eg teststoragewebsitedegero.z8.web.core.windows.net
az cdn profile create -n storagewebsitecdn -g storagewebsitetest --sku Standard_Microsoft

az cdn endpoint create -n storagewebsiteendpoint -g storagewebsitetest --profile-name storagewebsitecdn --enable-compression --origin-host-header <hostname of your storage website url> --origin <hostname of your storage website url>

az cdn endpoint show -n storagewebsiteendpoint -g storagewebsitetest --profile-name storagewebsitecdn --query "hostName" -o tsv
Copy the output of the last command and browse to <copied hostname> and you should see the ‘welcome’ text.
Go to your Domain registrar web portal and add a CNAME entry with a new subdomain and hostname as your copied value (make sure you have a . (period)) at the end eg: <somename>.azureedge.net. Run the below command with –hostname as your newly created full subdomain eg ilikedogs.mydomain.com
az cdn custom-domain create -g storagewebsitetest --endpoint-name storagewebsiteendpoint --profile-name storagewebsitecdn -n storagesitecustomdomain --hostname ilikedogs.mydomain.com

az cdn custom-domain enable-https -g storagewebsitetest --profile-name storagewebsitecdn --endpoint-name storagewebsiteendpoint -n storagesitecustomdomain
In the above we registered our custom domain with the cdn endpoint then enabled https for the custom domain. These commands will take several minutes to complete. You can check in the Azure portal by searching for the endpoint ‘storagewebsiteendpoint’ and clicking the custom domain in it’s overview blade. Or run the below command and check until ‘customHttpsProvisioningState’ returns as ‘Enabled’ and ‘customHttpsProvisioningSubstate’ returns as ‘CertificateDeployed’
az cdn custom-domain show -g storagewebsitetest --profile-name storagewebsitecdn --endpoint-name storagewebsiteendpoint -n storagesitecustomdomainBrowse to your custom subdomain eg. https://ilikedogs.mydomain.com. You should see the word ‘Welcome!’
🎉 Congratulations! 🎉 Your website is now accessible on a custom subdomain with https with the added bonus of being served to people around the world from edge server locations closest to them.
Cleaning up
If you followed the Bonus section you will need to first delete your subdomain with your domain registrar and wait a several minutes for the change to propagate to other DNS servers. You can check with the ‘nslookup <subdomain.mydomain.com>’ command that it no longer exists and then:
az group delete -n storagewebsitetest Tutorial 3 – Azure App Service Free Tier
Pre Reqs: NodeJS 18, Powershell or Bash, Azure CLI (logged with subscription set)
In Powershell / Bash as an admin in and empty directory, run the following commands:
npx express-generator testfreeapp --view ejs

cd testfreeapp

npm install

npm start
Browse to http://localhost:3000 to confirm node app is working. Press ctrl-c in your cmd line to stop the app.
Now we’ll create the resource group, free linux app service plan and app service to run a NodeJs webapp, then set it to build on deploy (this is not set on by default as most cicd deploys a prebuilt payload). Finally we will run the deploy command.
I’ve set the app service to run under linux in the odd chance you keep this and need to scale up (it is substantially cheaper than the paid windows plan). There are limits to the number of linux free plans you can have, if you encounter an error you can remove the –is-linux to create a free windows plan.
Back in your Powershell/bash in the ‘testfreeapp’ directory, make up a unique 32char max for freeappservicetest in the commands below:
az group create -n rg-appservicetest -l australiaeast

az appservice plan create --name appservicetestlinuxplan --resource-group rg-appservicetest --sku FREE --location australiaeast --is-linux

az webapp create --name freeappservicetest --plan appservicetestlinuxplan --resource-group rg-appservicetest --runtime "NODE:18-lts"

az webapp config appsettings set --resource-group rg-appservicetest --name freeappservicetest --settings SCM_DO_BUILD_DURING_DEPLOYMENT=true

az webapp up  --runtime "NODE:18-lts" --name freeappservicetest
Open your browser to the ‘URL’ value in the result JSON, you can also use HTTPS
🎉 Congratulations! You have created a free server-side web hosting instance on HTTPS. 🎉
You’ll notice the ‘az webapp up’ cmd mentions “Webapp already exists”, this command can be used with a new unique name as an alternative to the az appserviceplan / appservice commands we started with but with more limited control. It’s a great way to create your Azure app service resources and deploy a web app as a one-line command (it will also set the SCM_DO_BUILD_DURING_DEPLOYMENT=true when it creates the app service).
You can also host plain HTML, a docker container, OR several other runtimes, To list the runtimes, run:
az webapp list-runtimes—– Bonus Section – Setup Azure CDN with custom domain —–
Copy the result from the below command:
az webapp show --name <your-unique-app-name> -g rg-appservicetest --query "hostNames" -o tsvPaste the value in to the az endpoint create cmd below for parameters –origin-host-header and –origin
az cdn profile create -n freewebappcdn -g rg-appservicetest --sku Standard_Microsoft

az cdn endpoint create -n freewebappendpoint -g rg-appservicetest --profile-name freewebappcdn --enable-compression --origin-host-header <hostname of your storage website url> --origin <hostname of your app service website url>

az cdn endpoint show -n freewebappendpoint -g rg-appservicetest --profile-name freewebappcdn --query "hostName" -o tsv
Copy the output of the last command and browse to https://<copied hostname> and you should see the ‘welcome to express’ text
Go to your Domain registrar web portal and add a CNAME entry with a new subdomain and hostname as copied value (make sure you have a . (period)) at the end eg: <somename>.azureedge.net. Run the below command with –hostname as your newly created full subdomain eg ilikedogs.mydomain.com
az cdn custom-domain create -g rg-appservicetest --endpoint-name freewebappendpoint --profile-name freewebappcdn -n freewebappcustomdomain --hostname ilikedogs.mydomain.com

az cdn custom-domain enable-https -g rg-appservicetest --profile-name freewebappcdn --endpoint-name freewebappendpoint -n freewebappcustomdomain
In the above commands, we registered our custom domain with the cdn endpoint created before. These commands will take several minutes to complete. You can check in the Azure portal by searching for the endpoint ‘freewebappendpoint’ and clicking the custom domain in its overview blade. Or run the below command and check until ‘customHttpsProvisioningState’ returns as ‘Enabled’ and ‘customHttpsProvisioningSubstate’ returns as ‘CertificateDeployed’
az cdn custom-domain show -g rg-appservicetest --profile-name freewebappcdn --endpoint-name freewebappendpoint -n freewebappcustomdomainBrowse to your custom subdomain eg. https://ilikedogs.mydomain.com. You should see the words ‘Welcome to express’
🎉 Congratulations! 🎉 Your app service webapp is now accessible on a custom subdomain with HTTPS with the added bonus of being served to people around the world from edge server locations closest to them.
Cleaning up
If you followed the Bonus section you will need to first delete your subdomain with your domain registrar and wait several minutes for the change to propagate to other DNS servers. You can check with the ‘nslookup <subdomain.mydomain.com>’ command that it no longer exists and then:
az group delete -n rg-appservicetestSummary
There are many ways to configure your web hosting in Azure. The above touches on the key areas I have used to get the highest bang for your buck with low-traffic websites. If you don’t want the constraints of these PaaS offerings, there are plenty other ways you can host web sites in Azure from Azure VMs to Azure Kubernetes services, you can see these in this Azure Compute Decision Tree . These are more suited to high control, high traffic, load balancing and WAF requirements, or if you have some legacy app not supported by Azure App Service.
If you have any feedback or issues with the tutorials please leave a comment. I hope this post has helped you get the best value out of your Azure hosting🙂
Resources
Downloads for tutorials
Node JS (Be sure download v18)